Achieve Product Development Success: Right Size Your Prototyping
The Reality of Prototyping: A Lesson Learned
A few years ago, we worked on a medical ventilator project. The client’s technology was innovative in that they were bringing together different technologies in a new way with the goal of fitting them into a compact box.
The first prototype we developed was a digital image (on the left, see image below). It was the exact look the client envisioned … it was compact and mobile.
Our quick visualization resonated with their business objectives and something they could easily (and proudly) show people to give them an idea of what it would look like.
This first prototype was the key inspiration for them to keep moving forward with us.

Behind the scenes, what they really needed is shown in the middle image.
Bringing these technologies together was no small feat. There was a lot of testing and a lot of research and development (R&D) that had to happen before we could say - with confidence -that we they would even fit into a box that size (based on the first prototype image).
What we ended up building was the first physical prototype (shown on the far right). It was a form-factor correct device (meaning its size, configuration and physical arrangement were correct), but technology packed in so tightly proved to be quite challenging for further work down the road.
Due to its compact size, the engineers couldn’t get in enough to fiddle with the knobs, add a sensor, etc.
It didn’t serve an engineering purpose well and because it was a first prototype, it didn’t serve the functional purpose well either.
What we learned from this project…
Prototyping Problem
Prototype development is very resource intensive (time, material, money, etc.).
To show progress, there are key points you want to hit along the way. Lack of discipline and focus will lead to a lot of wasted resources.
You need an approach on how to prototype effectively.
So, let’s step back all the way.
What is a prototype?
A prototype is any model that introduces a design solution to the questions that a development team may have about it.
Prototyping allows us to:
Test assumptions
Learn about the user
Learn about the technology integration
Demonstrates progress to investors or higher ups
Mark progress for medical device development
MYTH: Rapid Prototyping = Easy
Rapid prototyping is made possible through:
3D printing
Arduino platforms
Yes, these great new tools allow us to create prototype iterations faster than ever before.
However, each prototype requires human capital and undisciplined iterations can bust your budget quickly.
You still need an approach to right-size the prototyping process.
How to Create a Protoyping Mission
Key: Focus on the part of the product that absolutely needs to work in order to prove your concept or technology and put your key resources on that task first.
Our story above is a perfect example of focusing on the wrong part of the project first. The technologies didn’t work in that compact of a space and we wasted resources by working on the design first. Though it looked good and we envisioned what the client wanted, that’s not what the product needed to succeed. Without the technologies, it wasn’t worth anything on its own.
A prototyping mission is crucial to any product development effort because it focuses your team’s activity and requires continued planning. The outcome is progress and efficiency.
Two pieces of a Prototyping Mission will help you clarify fidelity, scope and process:
Identify your audience – make sure you have the right audience in mind. These are the people who hold the keys to moving your project forward or stopping it in its tracks.
Define your purpose - what does this prototype need to do? What do we need to show your audience?
Identify Your Audience
Identify who has the authority of continuation. Who has a stake in your product at this phase? Who has the authority to move it forward or stop it in its tracks? This person could be a potential partner, an investor or your boss.
Seek to reduce their personal risk. Once you’ve identified this person, find what they are most interested in. How do they personally win by approving your project or giving you money? Do they care most about the technology working? On time delivery? Budget?
Once you have the audience, you need to think through the purpose of your prototype.
Define Your Purpose
Watch out for the pitfalls of your audience. Your audience will want everything … now and cheap. If this is their request, you’ll have to prioritize yourself based on their perceived risks of the project.
Identify areas with the greatest risk. It’s better to solve one thing quickly versus all things slowly. What is the biggest blocker for this audience that you can show in the first prototype?Example from our story above: The biggest blocker we should have proven is that our ventilator can put out enough gas … not that it’s pretty or fits in the overhead luggage compartment.
Your prototype’s purpose will be informed by the audience you defined, their perceived risk and last, the phase of project you’re in.
Identify Your Project Phase
Understanding the development phase you’re in is an important factor to consider when creating your prototype mission.
In fact, each phase should have its own prototype mission as it’s critical to de-risking the situation.
Project phase informs mission
Phase provides insight into who your audience is and what their purpose might be
This is a snapshot of our product development process here at Product Creation Studio. Your project phase should fall into one of these four buckets:
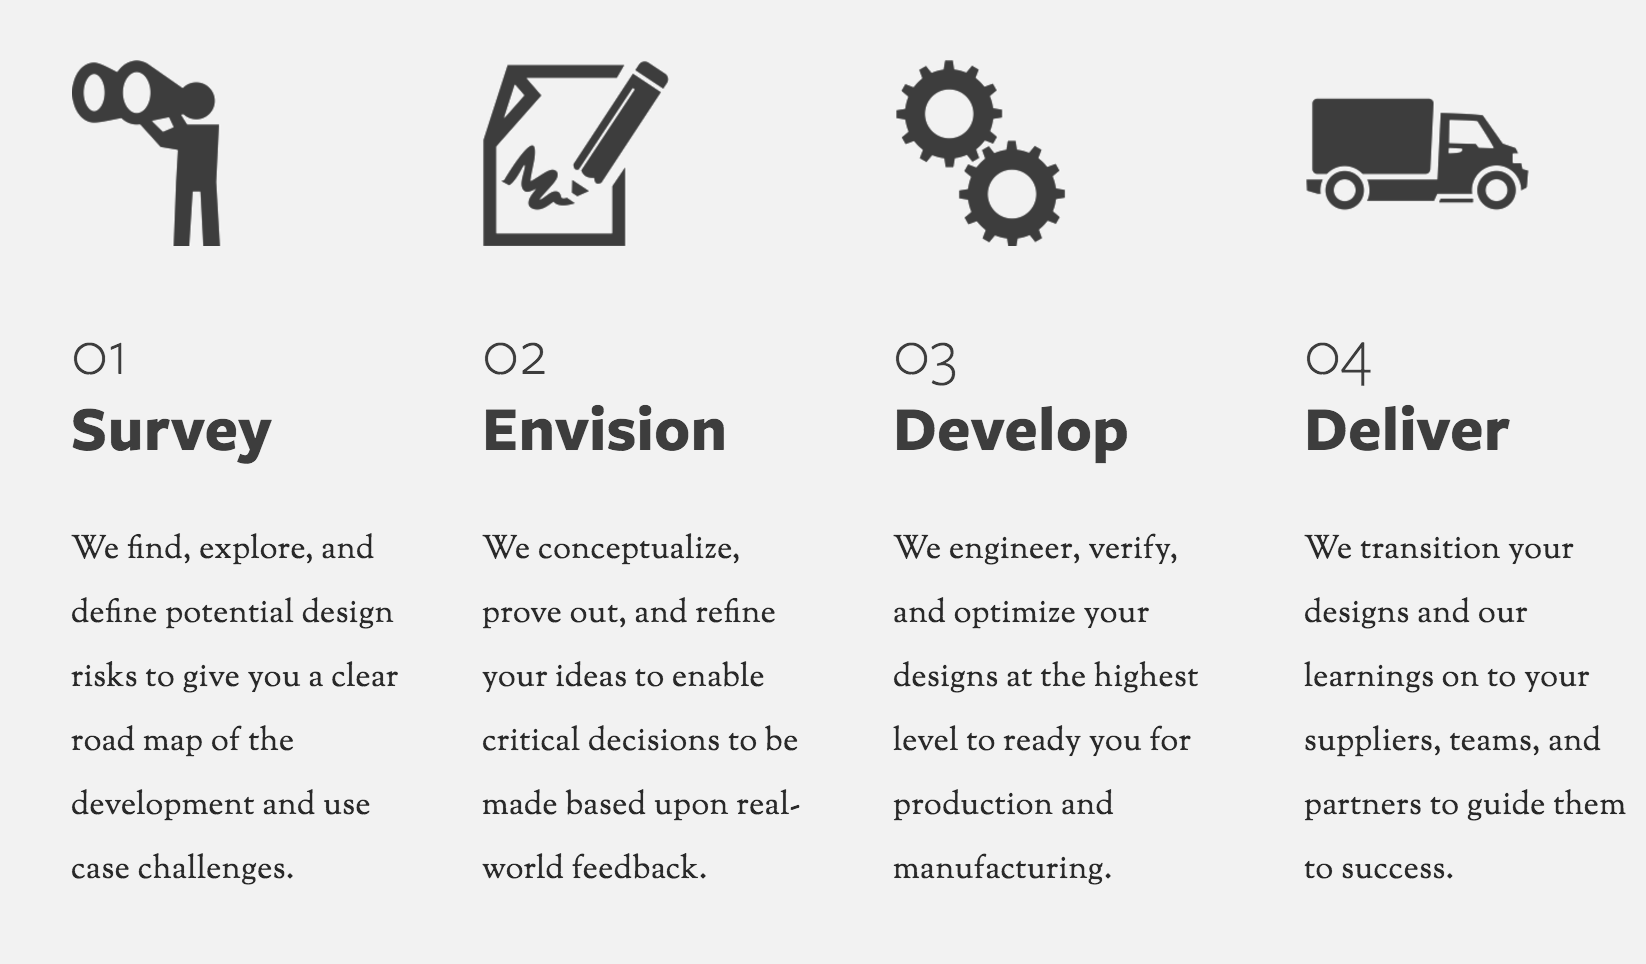
01 Survey Phase
The image below is an example of the different prototypes based on the phase of the project we were in for our client Advanced Bionics (a cochlear implant audio processor).

The survey phase is where you get to explore what is possible and play around with different ways to solve your problem.
In this phase, you should determine:
Requirements, constraints and needs
Identify your audience (e.g., internal team)
Define your prototype’s purpose (e.g., to learn about different opportunities)
Your prototypes should be:
Low-fidelity –incomplete, meant to provide an experience of the product. Better to have 10 different prototypes with your budget than two really nice ones so you can understand the parameters in which you should play in.
Analyses – a prototype in this phase may be just analysis organized in an Excel doc. You’re exploring and researching what’s possible.
Illustrations – this prototype may even be a series of illustrations that represent what your vision is.
02 Envision Phase

From the survey phase, you will down select to get to the product vision you want to pursue. This prototype will include more details as you will start to think about putting it in front of actual users for usability and human factors testing.
In this phase, your prototype goal is to remove risk through:
Concepts, architectures, form factor-correct prototypes
Identifying your audience (e.g., a stakeholder, someone your internal team who will make the decision to move forward)
Define your prototype’s purpose (e.g., prove your solution works)
Your prototypes should be:
De-coupled from the technology portion - hardware and technology are worked on separately.
Form factor-correct models – design should define shape, size and other physical specifications so you know if you’re putting the right package together for the customer.
Functional prototypes – a fully functional representation of what that product will look like once it’s completed.
03 Develop Phase

In this phase, your goal is to refine the prototype for manufacture through:
Product details, functions and testing
Identifying your audience (most likely an agency like FCC or FDA where you’re trying to prove safety, effectiveness, etc.)
Define your prototype’s purpose (should be production-ready)
Your prototypes should be:
Mechanical – get down to the nuts and bolts of what your product includes and how it will be used in the real world.
Pre-production – ready to be sent out for manufacturing.
Tooling samples – based on small volume or large volume production.
04 Deliver Phase

Here, you are focusing on the production of your prototype and:
Transition the design to the manufacturing facility
Identify your audience (manufacturing reps)
Define your purpose (to transition the design, give the reps confidence it’s a good design)
Your prototypes can or should be:
First articles – any part of the product that is being fabricated for the first time.
Assembled and used as test equipment – I pushed the button 10 times and it worked, what about a thousand? You’ll see how it works, how it fails, etc.
Device Master Record - for the medical space specifically, a DMR is a document that represents what the device really is and what is being manufactured. A draft of this document can even serve as an early prototype as well.
Right-sizing Your Prototype - Key Takeaways
Prototypes mark progress – you need to create prototypes you can learn from quickly
Disciplined prototyping preserves budget - undisciplined prototyping burns budget
Make your prototyping mission your guide
Audience – what are their perceptions of risk
Purpose – risk will inform the purpose of the prototype for each phase
Prototypes can be virtual – can be a rendering or an analysis if that’s what makes sense in that phase
For a few more prototyping tips and real world examples from our list of clients, check out Scott's video of the presentation below!